Paul Hammant's Blog: SwiftUI Component Testing with Appium & Test Harnesses
Not sure this the final entry in a series exploring my “UI Component Testing” (started in 2017), but here goes. Over the last couple of weeks, I’ve shown implementations using Playwright, Cypress, Selenium, and NightWatch for a React web application. Now, we leave the web behind and see how the same principles apply to native desktop development with SwiftUI. At true to the oiginal blog entry a credit card component and a couple address-of-credit card component.
The core idea remains the same: test UI components in the “smallest reasonable rectangle” using dedicated test harnesses, enabling fast, isolated, and reliable tests before integrating them into a full application, but more visibly showing the things that would feed into a component and the outcomes of interactions with it.
The Application: A Native SwiftUI Payment Form
Repo: github.com/paul-hammant/swiftui-component-testing-with-appium
To get going with this repo, you’ll need Developer tools (the full app) on a recent Mac, as well as Node 22+. and Appium. After npm install, you’ll need to do appium driver install mac2.
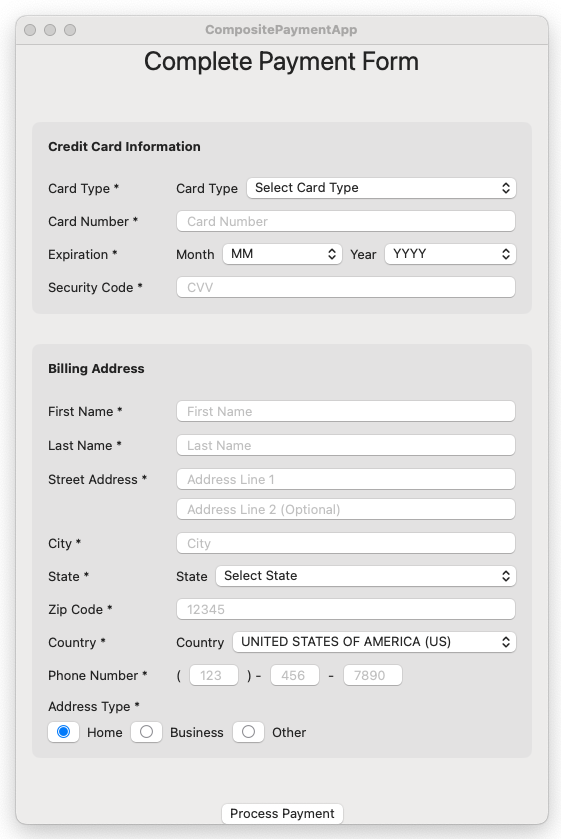
Instead of the “Car Doppler” web app, this example uses a simple macOS payment application built entirely in SwiftUI. The application consists of two main components, and an pseudo app:
- CreditCardView: A form for entering credit card details.
- BillingAddressView: A form for entering a billing address.
- CompositePaymentApp: The “real” application that combines both components (pseudo)
The components are combined in a final CompositePaymentApp to illustrate a complete payment screen, is is just a mockup. Just the placement of the two MVVM components above in an application that you could ship to customers were it finished and useful.
The composite app, outside of test automation:
Test Automation for SwiftUI
We have two tiers of testing: blazing fast unit tests and UI component testing in the style I have been blogging about.
Swift Unit & Integration Tests (swift test)
These tests operate directly on the data models in UIComponentTestingLib without launching any UI. They are incredibly fast. We could run hundreds of tests a second, but we don’t have that many in this repo. Being integrated into the Swift environment, these will compile prod and test code if needed before running.
Component Test via Appium (npm test)
To automate our SwiftUI test harnesses, we use Appium with its Mac2 driver. This gives us a powerful, Selenium/Webdriver-like ability to drive our native macOS application from an external script—in this case, JavaScript with WebdriverIO. WebDriver is familiar to me already, of course.
The key to achieving our component testing goal is to not totally rely on brittle UI interactions like typing. Here we use a combination of accessibility identifiers and fast data injection, to do some heavy lifting. To aid injection of data, we have aTextEditor view for JSON test data and a “Load Test Data” button to take that and push it into the model using regular functions of the production UI. Via Appium, this is quite smooth,
These tests launch the actual test compoenent harness app(s) and interact with them through the UI layer. They are slower but provide higher confidence that the components are visually correct and interactive. They are more representative of testing the full, compiled application in a way a user would interact with it (albeit with our data injection shortcut). And you have to remember to compile the swift pieces as NPM/Node and JS is a different world toward the scripted testing of this substantially MacOS app.
Anyway, here’s the video of UI component testing in the test harness:
Appium wants the whole screen. It places a shade layer over everything with an “Automation Running” message, to give you the distinct impression that you should take your hands off the mouse/kbd for the duration.
MacOS apps and Appium
It has been difficult ironing the kinks out of this demo. There are a few processes that need to be orchestrated which feels harder than treating everything as a lib for the language ecosystem in question. And also some permissions in MacOS settings (Settings -> Security & Privacy -> Accessibility) that I must say I still have not resolved the all the permutations of. I run regular Terminal on the Mac, as well as VsCode and JetBrains’ “Fleet”. The runner of the Appium script is NodeJs (node the executable). Node is off in a Homebrew manage folde for me. One which could easily change with a brew update/upgrade some time later. The registration is via fully qualified path like /opt/homebrew/Cellar/node/<version>/bin/node. A path that is not easy to enter into the same Mac settings UI that manages what has elevated privs and what does not. Then, after you’ve entered it, the fully qualified path disappears and you’re going to see it as just “node” in the list. This is inauthentic in my opinion and a hole in the Mac’s claimed impregnable security armour, but that is an aside. Running the suite, Appium could fail to find the test app and that could be because of this missing privilege. Or it could be something else. It may have worked for you last week, but because of one brew-upgrade it may not today. I am not sure that Appium can be changed to mind-read what the root cause problem could be. Even without version upgrades it is unclear whether how many runners I have to register in there - VsCode and Node and Fleet? Seems to broad.
My beefy ChromeBook plus has great separations between the OS and the VM I’m developing in. Easy to redo things too if I mess them up. Importantly, it’s hard on the Chromebook for a rogue developer-installed thing to take over the whole OS. I can’t have a Mac VM within the Chromebook though (not even the Docker-OSX thing or related), but I feel VMs are the way forward. Ideally, I’d have a MacOS VM within MacOS just for the programmatic testing of developed apps under Appium-like control. This would (should IMO) take only megabytes of disk, not gigabytes and be lean enough to run on 8GB RAM machines. Inside that Mac VM, I would want all permissions without fiddling with settings post install. I’d want a script to run on boot from an overlay that Appium would setup. Could be that we have that in Tahoe that we know ships with better containers, but I’ve not upgraded yet as it is in beta. It is also for Linux containers only, but a subsequent beta release will likely be for lightweight Mac VMs too.
It could be I already have lean Firecracker-style VMs capability for Mac Sequoia (v15) with “Lume” - see Show HN: Lume – OS lightweight CLI for MacOS and Linux VMs on Apple Silicon. It is Apple silicon only and I have the last of the Intel Macs for now. It is also for pre-built images (they have some Packer tech too). I’d be really happy with “same as host” retrictions on the VM in order to get to the megabyte place. The BSDs do this well I think with “jails”. I’ve talked of the principles of containment before (2016) and this all feels in that direction. To carve a larger screen into VMs seems doable: when the mouse is in that rectangle, it gets mouse/keyboard/camera/mic and can use speakers and video (as far as the scaled rectangle allows). When the mouse is outside that rectangle, some of those are lost, but not in a “USB unplugged” way. And I’d also want real touchpad as virtual touchpad, not re-presented as a mouse. Sandboxes are quite well understood by now, but the containing system should be able to easily grant more than defaults.
Anyway, enjoy this component tests with test harness for a (fat) MacOs app … that is closer to the 2017 blog entry punditing around this testing stuff.
PS: Pseudo-declarative UIs
It is also worth mentioning that I love pseudo-declarative markup languages like SwiftUI and have a 30 blog entries on the concept. Gazing at the main.swift sources in github.com/paul-hammant/swiftui-component-testing-with-appium/blob/main/Sources/ is where you’d see this markup style.